It's 5th birthday week at StampNation!
We are celebrating with a free stencil class for our membership.
Here is a sneak peek of a card I made for the challenge . . .
This one is masking w/stencils, and this is one of many, many creations you will find posted as part of the class. I recommend you check out StampNation.
Wednesday, January 13, 2016
Friday, January 8, 2016
Technique Blog Hop - January - Emboss Resist
Hello all, and welcome to this month's Technique Blog Hop. This is the first in a year-long series of monthly blog hops focusing on
techniques for card makers. Each month we will feature a new technique
. . . a new fold . . . a new product. We've assembled a team of
cardmakers who range from new to advanced, so you will see a great
variety of cards and ideas.
This month we will be focusing on the emboss resist techniques and WOW have we got some cool cards for you today. I caught a sneak peek of them earlier in the week, and I can't wait to hop myself.
We love feedback, so please be sure to comment on each of the blogs in today's hop. Each comment on the 12 hops throughout the year will be entered into a prize drawing for a $25 Blitsy.com gift certificate at the end of the year.
Now, on with my projects for the hop.I tried a couple of techniques, and the best advice I can give is not to give up on whatever artistic panels you create. I'll admit a few hit the bottom of my trash barrel, but sometimes you need marinate on them overnight in order to see the creativity.
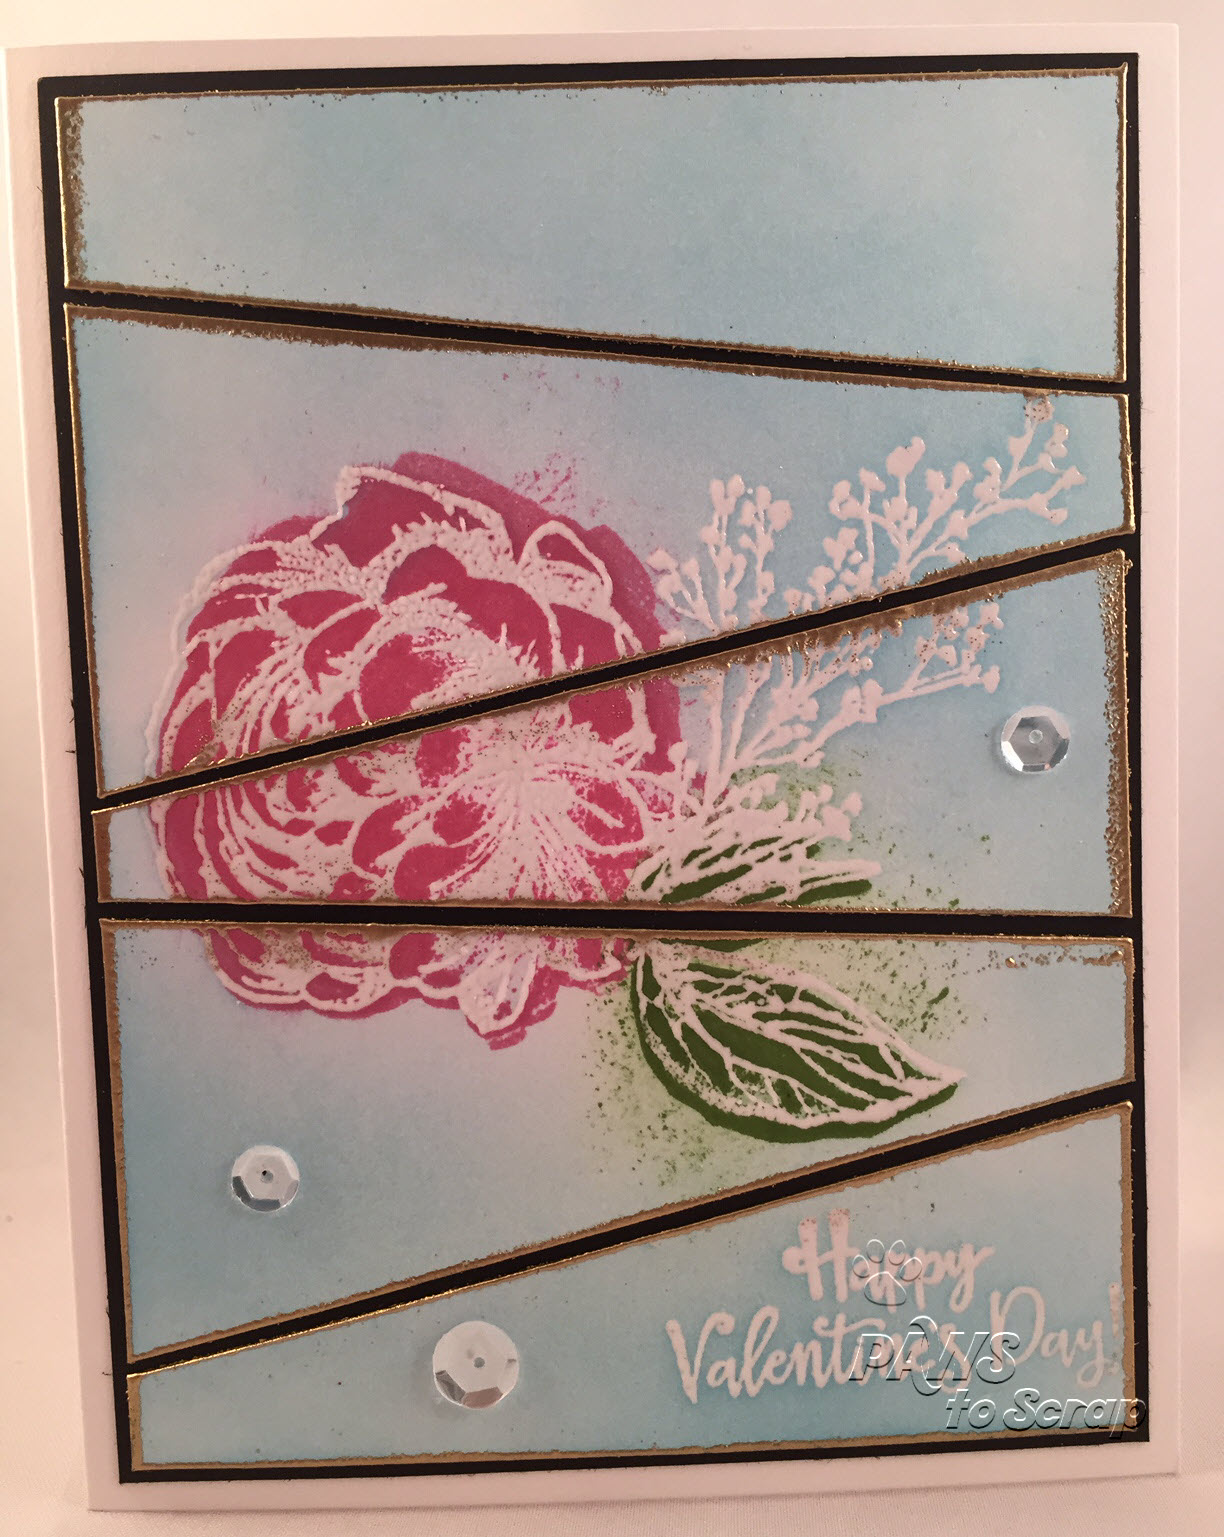
First up for me is a card created using white embossing powder and "fill" images from a two-step stamp. I white embossed the watercolor cardstock, and then used dye inks to fill in the color. I also sponged the blue background.
I will admit that I struggled with this because the stamped fill was outside of the lines. But I followed thru and finished the card, regardless. I also sponged the blue background, and the green and pink colors went a bit out of the lines even more! Note that I cut the finished piece into random panels and embossed the edges in gold.
For my second card I wanted to try embossing an entire watercolor panel using a background stamp and then masking and adding color to an inner framed portion. I'll admit that I struggled with this one as well. I'm such a linear scrapper! The embossing powder on this one was clear. I used distress ink to watercolor the flowers and leaves.
I do love looking at it close up, as opposed to from a distance. That's when you can see that the embossing covered the entire panel.
My third card was my favorite. Can you say clean lines and linear? This is right up my alley. For this one I used a pre-embossed piece of cardstock from Stampin' Up. I sponged dye ink over the panel and tried to stay darker on the outer edges. I die cut the star images, and popped it over my white card base.
My sentiment spoke of "sparkle" so I added some sparkle in the form of the rhinestones in the stars and some black glitter embossing powder on the edges of the sentiment.
And my second favorite was created using Kevin Oliver Color Bursts on watercolor paper. For this one I embossed the dog and paw images first, and then spritzed the entire piece with water. I then applied two colors of the Color Burst over the panel Then more spritzing. Then more color burst. Maybe more spritzing. Just play until you get what you want.
I also sprayed with water that had Perfect Pearls . . . hence that sheen that is showing below.
I really love the contrast of shading on this panel. I love the darker areas of the panel.
Up next is Sharon at A Piece of Heart
I hope these will inspire some creativity, and I hope you find some time to create!
Here's today's line-up in case you get lost along the way
Theresa - http://scrapsbygracie.blogspot.com/
Kim - http://katydidcards.com/
Claudia - http://www.claudiahenderson.blogspot.com/
Denise - http://www.craftconfectionery.com/
Debbie - http://pawstoscrap.blogspot.com/
Sharon - http://piece-ofheart.blogspot.com/
Lisa - http://lisaslittlerascals.blogspot.com/
Jearise -http://lorbysworld.blogspot.com/
This month we will be focusing on the emboss resist techniques and WOW have we got some cool cards for you today. I caught a sneak peek of them earlier in the week, and I can't wait to hop myself.
We love feedback, so please be sure to comment on each of the blogs in today's hop. Each comment on the 12 hops throughout the year will be entered into a prize drawing for a $25 Blitsy.com gift certificate at the end of the year.
Now, on with my projects for the hop.I tried a couple of techniques, and the best advice I can give is not to give up on whatever artistic panels you create. I'll admit a few hit the bottom of my trash barrel, but sometimes you need marinate on them overnight in order to see the creativity.
First up for me is a card created using white embossing powder and "fill" images from a two-step stamp. I white embossed the watercolor cardstock, and then used dye inks to fill in the color. I also sponged the blue background.
I will admit that I struggled with this because the stamped fill was outside of the lines. But I followed thru and finished the card, regardless. I also sponged the blue background, and the green and pink colors went a bit out of the lines even more! Note that I cut the finished piece into random panels and embossed the edges in gold.
For my second card I wanted to try embossing an entire watercolor panel using a background stamp and then masking and adding color to an inner framed portion. I'll admit that I struggled with this one as well. I'm such a linear scrapper! The embossing powder on this one was clear. I used distress ink to watercolor the flowers and leaves.
I do love looking at it close up, as opposed to from a distance. That's when you can see that the embossing covered the entire panel.
My third card was my favorite. Can you say clean lines and linear? This is right up my alley. For this one I used a pre-embossed piece of cardstock from Stampin' Up. I sponged dye ink over the panel and tried to stay darker on the outer edges. I die cut the star images, and popped it over my white card base.
My sentiment spoke of "sparkle" so I added some sparkle in the form of the rhinestones in the stars and some black glitter embossing powder on the edges of the sentiment.
And my second favorite was created using Kevin Oliver Color Bursts on watercolor paper. For this one I embossed the dog and paw images first, and then spritzed the entire piece with water. I then applied two colors of the Color Burst over the panel Then more spritzing. Then more color burst. Maybe more spritzing. Just play until you get what you want.
I also sprayed with water that had Perfect Pearls . . . hence that sheen that is showing below.
I really love the contrast of shading on this panel. I love the darker areas of the panel.
Up next is Sharon at A Piece of Heart
I hope these will inspire some creativity, and I hope you find some time to create!
Here's today's line-up in case you get lost along the way
Theresa - http://scrapsbygracie.blogspot.com/
Kim - http://katydidcards.com/
Claudia - http://www.claudiahenderson.blogspot.com/
Denise - http://www.craftconfectionery.com/
Debbie - http://pawstoscrap.blogspot.com/
Sharon - http://piece-ofheart.blogspot.com/
Lisa - http://lisaslittlerascals.blogspot.com/
Jearise -http://lorbysworld.blogspot.com/
Supplies
Used - Happy Valentines Day
Cardstock:
Solar White (Neenah), Basic Black (Stampin' Up), Watercolor (Close To My
Heart)
Stamps:
Beloved Bouquet (Close To My Heart)
Ink: Cotton
Candy, Topiary, Glacier (Close To My Heart) and Versamark
Other: Gold
and White Embossing Powders (Ranger), Sparkling Clear Sequins (Pretty Pink
Posh)
Supplies
Used - Thanks So Much
Cardstock:
Solar White (Neenah), Basic Black (Stampin' Up), Watercolor (Bee)
Stamps:
Cover-a-Card Roses (Impression Obsession), Mini Messages (Mama Elephant)
Dies: Mini
Tags (Mama Elephant)
Ink: Worn
Lipstick, Festive Berries, Pine Needles (Ranger Distress); Versamark
Ribbon: Twine
(The Stamps of Life)
Other: Clear
and White Embossing Powders (Ranger), Sparkling Clear Sequins (Pretty Pink
Posh)
Supplies
Used - Sparkle
Cardstock:
Marshmallow (Bazzill) and White Daisy (CTMH)
Pattern Paper:
Irristibly Yours DSP (Stampin' Up)
Stamps: Shiny
Happy Sentiments (Lil' Inker)
Dies: Stitched
Stars (Lil' Inker)
Ink: Juniper
(Close To My Heart), Tuxedo Black (Memento), Versamark
Other: Bitty
Sparkles (Close To My Heart), Black Sparkle Embossing Powder (Ranger)
Supplies
Used - Feeling Ruff
Cardstock:
Marshmallow (Bazzill), Chocolate Chip (Stampin' Up), Watercolor Paper
(Close To My Heart)
Stamps: Love
My Dog (Close To My Heart)
Ink:
Versamark, Merlot and Sepia Color (Ken Oliver Color Burst), Candied
Apple (Ranger Distress Marker)
Ribbon:
Scallop Dot (Stampin' Up)
Other: White Embossing Powder (Ranger), Liquid Glass
(Close To My Heart)
Wednesday, January 6, 2016
Ring in the New Year
Happy Wednesday!
I'm popping in with extra excitement today, as I was asked to guest design for one of my favorite crafty places . . . StampNation!
I know that I've both talked and written about StampNation before. It's my favorite place for inspiration, and not just because of the creative genius that I see there on a regular basis. It's also because the people are amazing. That includes the founder, design team and membership. It is an amazing community of creativity and camaraderie. And did I mention there were over 500 video tutorials on StampNation?
So today I am sharing a sneak peek of the cards, including mine, that were designed for StampNation. Their newest challenge - Ring in the New Year - went live this morning for the members.
Now if you are not a member and would like to check it out, you can click HERE or click on the StampNation image above.
And if you are a member already and want to head to the home page of StampNation, you can click HERE. You will find the newest challenge under "Newest Threads" on the right (or scroll down to find challenges underneath the tutorials section).
I'm glad you stopped by, and I hope you find some time to create today!
I'm popping in with extra excitement today, as I was asked to guest design for one of my favorite crafty places . . . StampNation!
I know that I've both talked and written about StampNation before. It's my favorite place for inspiration, and not just because of the creative genius that I see there on a regular basis. It's also because the people are amazing. That includes the founder, design team and membership. It is an amazing community of creativity and camaraderie. And did I mention there were over 500 video tutorials on StampNation?
So today I am sharing a sneak peek of the cards, including mine, that were designed for StampNation. Their newest challenge - Ring in the New Year - went live this morning for the members.
Now if you are not a member and would like to check it out, you can click HERE or click on the StampNation image above.
And if you are a member already and want to head to the home page of StampNation, you can click HERE. You will find the newest challenge under "Newest Threads" on the right (or scroll down to find challenges underneath the tutorials section).
I'm glad you stopped by, and I hope you find some time to create today!
Tuesday, January 5, 2016
Bokeh for Can You Case It
Someone at my favorite crafty place, StampNation, posted a bokeh card today. I love bokeh, and I could not wait to sit down and stamp and create a bokeh creation. The color scheme comes from the challenge at Can You Case It, where the suggested colors were purples, blues and neutrals.
I used distress markers to create my card panel. Colors used were Broken China, Stormy Sky, Seedless Preserves and Victorian Velvet. After scribbling color on a watercolor panel, I spritzed with a lot of water and used a heat gun to dry. It was still splotchy, but I used round stamps (they can be the back of a sentiment stamp that is round) in varying sizes stamped in white pigment ink.
A super fun technique that gives great results. I hope you find some time to create, and when you do, I highly recommend you give this technique a try.
I used distress markers to create my card panel. Colors used were Broken China, Stormy Sky, Seedless Preserves and Victorian Velvet. After scribbling color on a watercolor panel, I spritzed with a lot of water and used a heat gun to dry. It was still splotchy, but I used round stamps (they can be the back of a sentiment stamp that is round) in varying sizes stamped in white pigment ink.
A super fun technique that gives great results. I hope you find some time to create, and when you do, I highly recommend you give this technique a try.
Supplies
Used - Thanks for Being Wonderful You
Cardstock:
Bazzill* and Bee Watercolor Paper
Stamps: Hand
Lettered Winter Wishes*, minis4circles and
award2stamp from The Stamps of Life
Ink: Simon
Says Stamp White Pigment Ink*, Ranger Distress Markers, Simon Says Stamp
Other: Pearls
from Simon Says Stamp
*from January Simon Says Stamp Card Kit
Sunday, January 3, 2016
A Merry Card for CASology
Today's card was inspired by the cue card at CASology.
I used supplies that were on hand from a Studio Calico kit.
Admittedly, I was especially excited to try my hand using that decorative masking tape.
I hope you find some time to create today . . . and perhaps use up some old supplies in your stash!
I used supplies that were on hand from a Studio Calico kit.
Admittedly, I was especially excited to try my hand using that decorative masking tape.
I hope you find some time to create today . . . and perhaps use up some old supplies in your stash!
Supplies
Used - Merriest
Cardstock:
Studio Calico*
Pattern Paper:
Studio Calico*
Stamps: City
Stamp Set (Life.Love.Paper)*
Ink: Stampin'
Up
Ribbon:
Stampin' Up
Other:
Sentiment Masking Tape from Studio Calico* and Enamel Dots from Twine +
Ink*
*Items noted were from Studio Calico Park Avenue Card
Kit
Labels:
CAS-ology,
Life.Love.Paper,
Stampin' Up,
Studio Calico,
Twine + Ink
Subscribe to:
Posts (Atom)